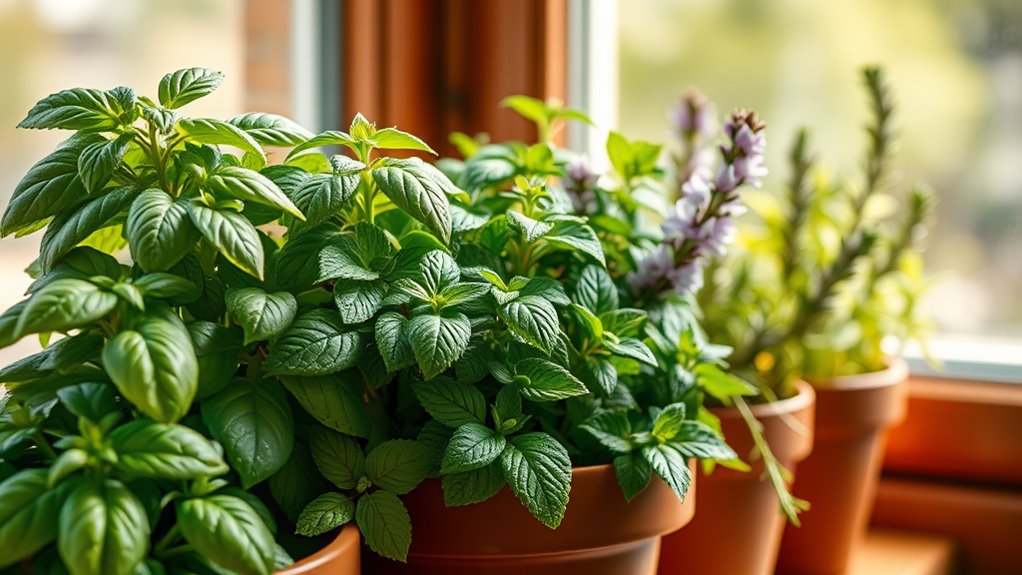
I Found the Best Herbs for Container Growing – And They’re Delicious
You’ve found top herbs like mint, basil, rosemary, thyme, and chives that thrive in containers—they’re simple to grow and deliver fresh, delicious flavors for your meals. Mint’s vigorous spread stays in check with pot confinement, basil flourishes in sunny spots with regular watering, and rosemary tolerates dry soil while adding zesty notes. Thyme needs minimal moisture, making it ideal for small spaces. You’ll uncover practical tips and creative uses next to boost your herb garden’s success.
Key Takeaways
- Mint thrives in containers and offers a refreshing, delicious flavor for teas and dishes.
- Thyme requires minimal water in small pots and provides a savory taste for seasoning meals.
- Rosemary grows well in well-drained containers, yielding aromatic leaves perfect for cooking.
- Basil needs sunny spots in pots and delivers sweet, flavorful leaves for sauces.
- Chives are simple to harvest from medium containers, adding a mild, onion-like zest to foods.
Top Herbs for Container Gardening
When you’re selecting herbs for container gardening, focus on varieties that adapt well to limited space and thrive with proper care.
For herbs in containers, mint offers vigorous growth but requires pot confinement to prevent overrunning.
Thyme suits small pots with its low-water needs and compact form.
Rosemary performs well in well-drained containers, tolerating dry conditions.
Chives thrive in medium-sized pots, providing easy harvests.
Parsley adapts to partial shade in containers, yielding abundant leaves.
These herbs in containers optimize urban spaces, delivering fresh flavors with minimal maintenance—choose based on your sunlight and soil preferences.
Incorporating these herbs supports low-maintenance gardening for a thriving setup.
By growing these herbs, you can experience delicious flavors that enhance everyday meals.
Essential Tips for Growing Basil in Pots
Basil thrives in pots with the right care, so you’ll want to start by selecting a sunny spot that offers at least six hours of direct light daily.
Use well-draining soil mixed with compost for optimal growth. Water when the top inch feels dry, and fertilize every two weeks with a balanced liquid feed.
To visualize basil’s vibrant success, follow these steps:
-
Soil preparation: Imagine mixing perlite into potting soil, ensuring perfect aeration for strong root development.
-
Watering precision: Picture checking soil moisture with your finger, applying water evenly to avoid leaf yellowing.
-
Pruning for health: Envision snipping stems just above leaf nodes, encouraging fuller, aromatic foliage.
Harvest regularly for the best flavor. By growing basil indoors, you can enjoy a year-round supply of fresh herbs.
For a thriving, low-effort garden, basil is one of the low-maintenance herbs that can flourish with minimal care.
Exploring Mint Varieties for Small Spaces
Mint varieties suit small spaces like pots or window boxes, where their vigorous growth adds fresh flavor to your setup.
You’ll find spearmint offers a mild, versatile taste, while peppermint delivers a bold, cooling punch—ideal for teas and dishes.
For small containers, choose compact varieties like apple mint to avoid overgrowth.
Plant in well-draining soil with partial sun; water consistently to keep roots moist but not soggy. As low-effort plants, they are perfect for those starting out in gardening.
Propagate via stem cuttings for quick multiplication, and pinch tips regularly to promote dense foliage.
This controls invasiveness and maximizes your harvest for everyday use.
Incorporating mint as an extraordinary herb can transform your gardening approach and elevate your garden’s success.
Rosemary: Perfect for Indoor Containers
Rosemary thrives in indoor containers, delivering robust flavor and aroma to your kitchen herb garden. As a Mediterranean native, you grow it with minimal fuss, requiring well-draining soil, full sun exposure, and sparse watering to mimic its arid origins. For optimal results, begin with soil preparation techniques that involve testing and amending the soil to ensure proper drainage and nutrient balance.
For vivid imagery of your rosemary setup:
-
Picture its silvery, needle-like leaves glistening under bright windowsill light, evoking sun-baked hills.
-
Envision the plant’s woody stems releasing a fresh, piney fragrance as you harvest for cooking.
-
Imagine compact growth in a terracotta pot, its resilience shining through dry periods.
You prune regularly to keep it bushy and productive.
Incorporating effective soil preparation can significantly improve the growth of your rosemary, as recommended for beginner gardeners.
Thyme and Its Easy Container Care
You plant thyme seeds directly in your container using well-draining soil, ensuring they’re spaced about an inch apart for optimal growth.
Once germinated, you monitor the soil’s moisture carefully, watering only when the top inch feels dry to prevent root rot.
This simple routine helps you maintain healthy thyme plants that thrive in limited spaces. Additionally, to keep your thyme plants pest-free, incorporate indoor pest control into your care routine.
To avoid common issues, always be vigilant for signs of overwatering that could harm your plants.
Planting Thyme Seeds
Thyme seeds thrive in containers with minimal fuss, making them ideal for beginners.
You’ll start by selecting a well-draining pot and fresh seeds for optimal results. As you plant, focus on these key steps:
-
Choose your seeds: Select high-quality thyme seeds from a reliable supplier, checking for viability to visualize tiny sprouts emerging vigorously.
-
Prepare the container: Fill a 6-inch deep pot with sterile, fast-draining soil mix, imagining the seeds nestled in a light, airy bed for strong root development.
-
Sow the seeds: Scatter them evenly at a 1/4-inch depth, spacing 2 inches apart, picturing a uniform grid that promotes healthy, bushy growth patterns.
Position your setup in full sun for emergence.
Maintaining Moisture Levels
While thyme thrives in drier soils, effective moisture management prevents issues like root rot in containers.
As a container gardener, you should check soil moisture regularly by inserting your finger an inch deep; if it’s dry, water deeply until it drains out the bottom.
Use pots with ample drainage holes and a well-aerated mix, like one with perlite, to promote airflow and prevent waterlogging.
In hot or windy conditions, you might water every few days, but always test first to avoid overhydration.
A simple moisture meter offers precise readings, ensuring your thyme stays healthy, aromatic, and productive.
Cilantro: A Fresh Option for Limited Areas
You plant cilantro seeds directly in your container, ensuring they’re spaced about 6 inches apart for optimal growth in limited areas.
As the plants mature, you’ll harvest the leaves by snipping them just above the soil level to encourage new growth.
This straightforward process lets you enjoy fresh cilantro right from your space-constrained setup.
Planting Cilantro Seeds
Cilantro seeds germinate quickly in containers, so sow them directly into well-draining soil that’s at least 6 inches deep.
You’ll need to maintain soil temperatures between 60-70°F for best results, ensuring even moisture without saturation.
To visualize successful planting:
-
Select your container: Pick a pot with drainage holes, imagining roots exploring nutrient-rich soil for strong establishment.
-
Prepare the seeds: Soak them overnight to speed germination, picturing tiny seeds swelling and ready to sprout.
-
Position and cover: Place seeds 1/4 inch deep and 2 inches apart, envisioning a neat grid that transforms into fresh, aromatic growth.
Harvesting Cilantro Leaves
Harvesting cilantro leaves at the right stage maximizes flavor and yield in your container garden. Aim to harvest when plants reach 6-8 inches tall, before bolting reduces quality.
Use sharp, sterilized shears to cut stems near the base, promoting regrowth and preventing disease. This method ensures you select outer leaves first, allowing inner ones to develop.
Harvest early mornings when essential oils peak for the best taste. Pick every few days for continuous supply, then rinse gently, pat dry, and store in the refrigerator wrapped in a damp paper towel to retain freshness up to a week.
Rotate plants for even growth.
Creative Ways to Use Your Harvested Herbs
After harvesting your herbs, you’ll discover innovative ways to incorporate them into meals, remedies, and crafts, maximizing their flavors and benefits while minimizing waste. Moreover, some of these herbs can be utilized for natural pest control to help maintain a chemical-free environment.
To visualize these uses, consider these techniques:
-
In meals: Chop fresh basil into pasta sauces, releasing aromatic oils that enhance taste and preserve nutrients for vibrant, homemade dishes.
-
In remedies: Infuse mint leaves into teas, extracting essential oils to soothe digestion and boost immunity with precise, health-focused brewing.
-
In crafts: Dry rosemary for potpourri, grinding it to release scents that create lasting, aromatic decor with minimal processing.
Additionally, certain herbs can act as natural pest repellents to help protect your garden ecosystem naturally.